
If you ever wondered how you could speed up Octane's ORBX export, here is a handy tip:
Octane supports the export via the commandline and "no GUI" versions of Cinema 4D.
Octane supports the export via the commandline and "no GUI" versions of Cinema 4D.
What's even more interesting is that the export via commandline speeds up the procedure by up to 15 times!
Reason for that partly is Cinema 4D's viewport does not have to be re-drawn for every frame.
Reason for that partly is Cinema 4D's viewport does not have to be re-drawn for every frame.
With this tutorial I'll show you how you can write a small batch file, which will automatically export an ORBX from your Cinema 4D file simply by right-clicking the file in the Windows Explorer.
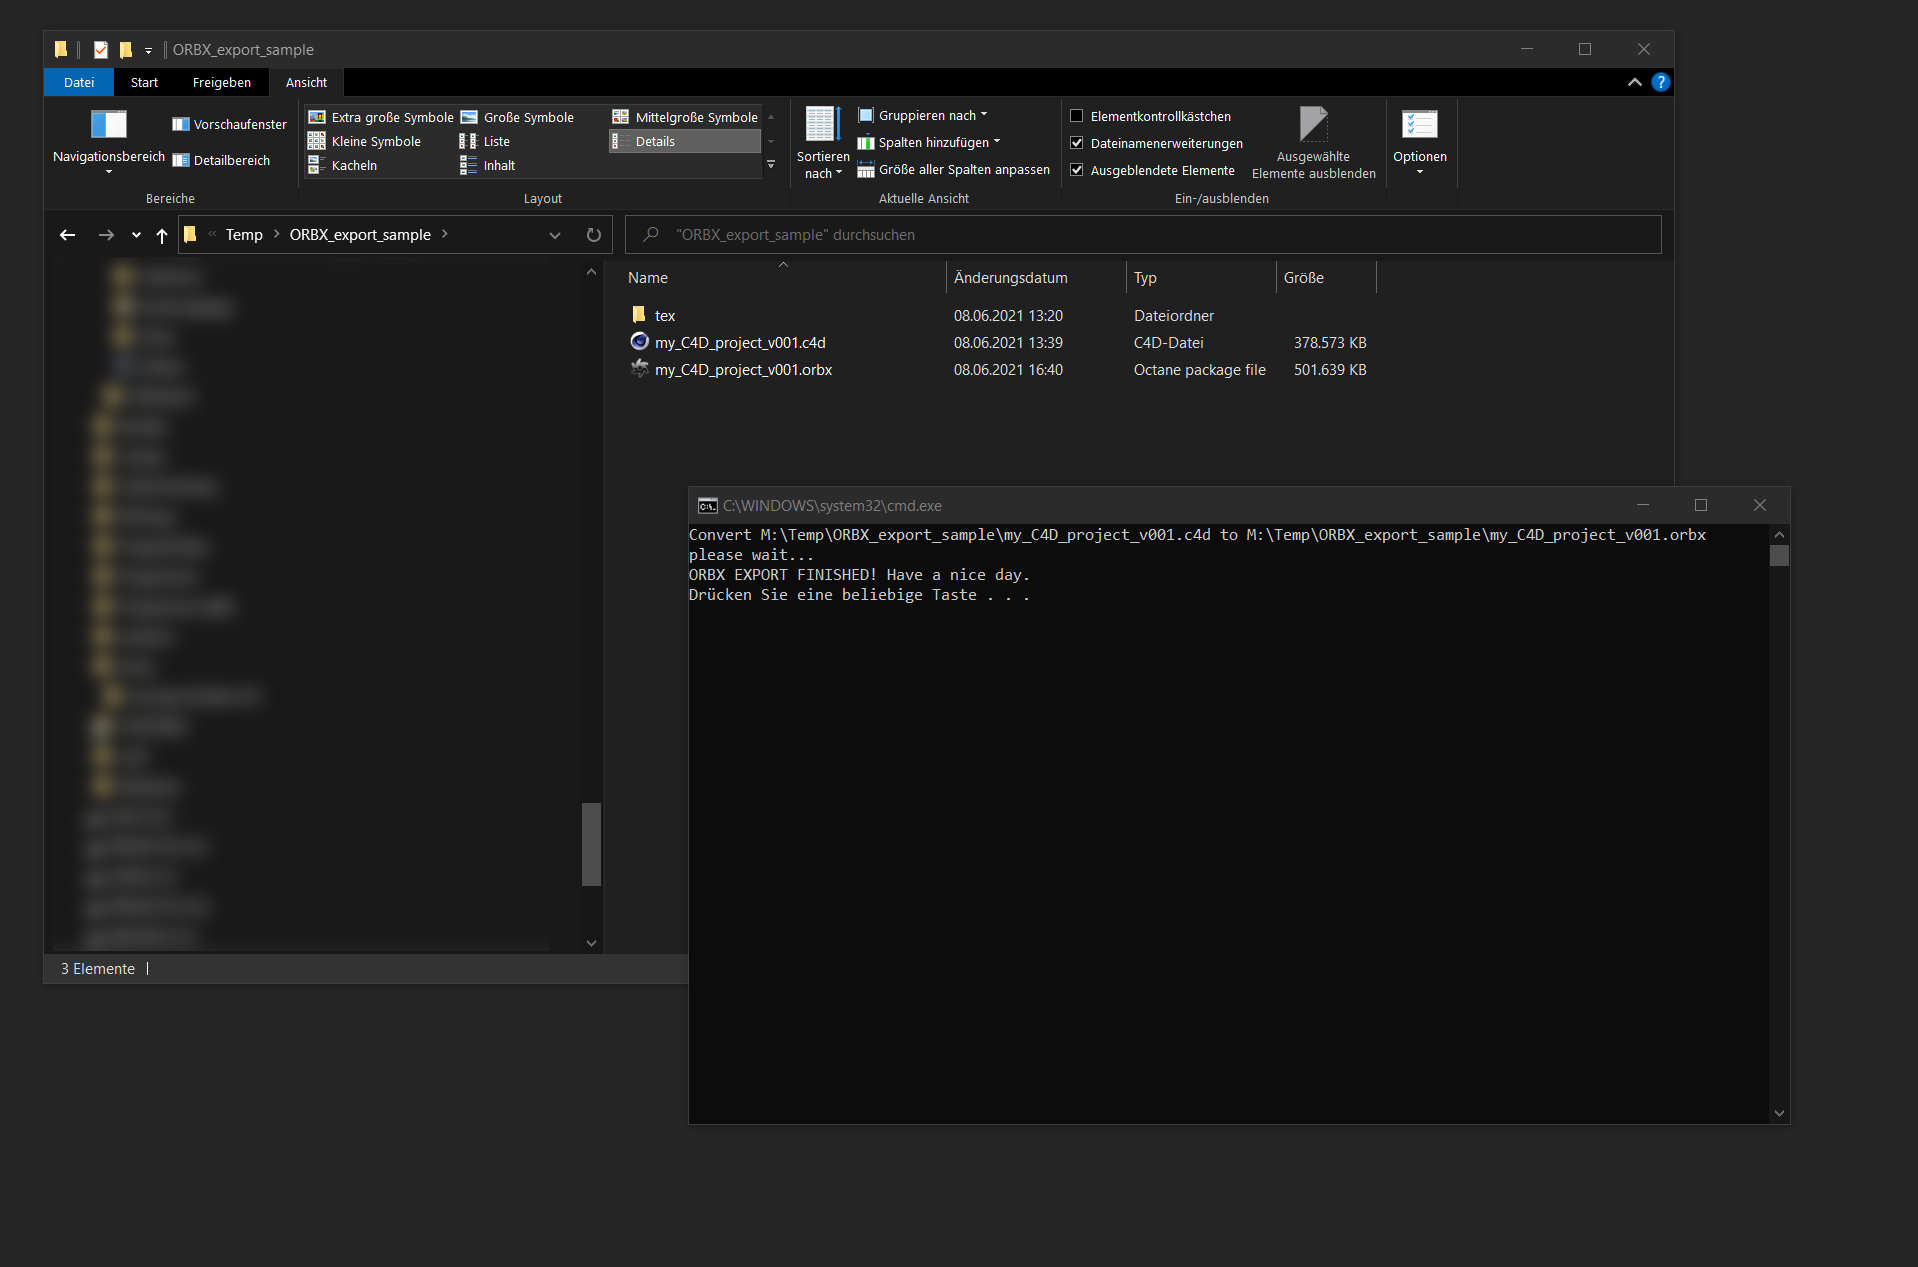
An ORBX file with the same name will appear next to your C4D file.
This workflow should work with any Cinema 4D version and was tested with Octane 2022.1 and above.
An ORBX file with the same name will appear next to your C4D file.
This workflow should work with any Cinema 4D version and was tested with Octane 2022.1 and above.
For Cinema4D 2024 (and above)
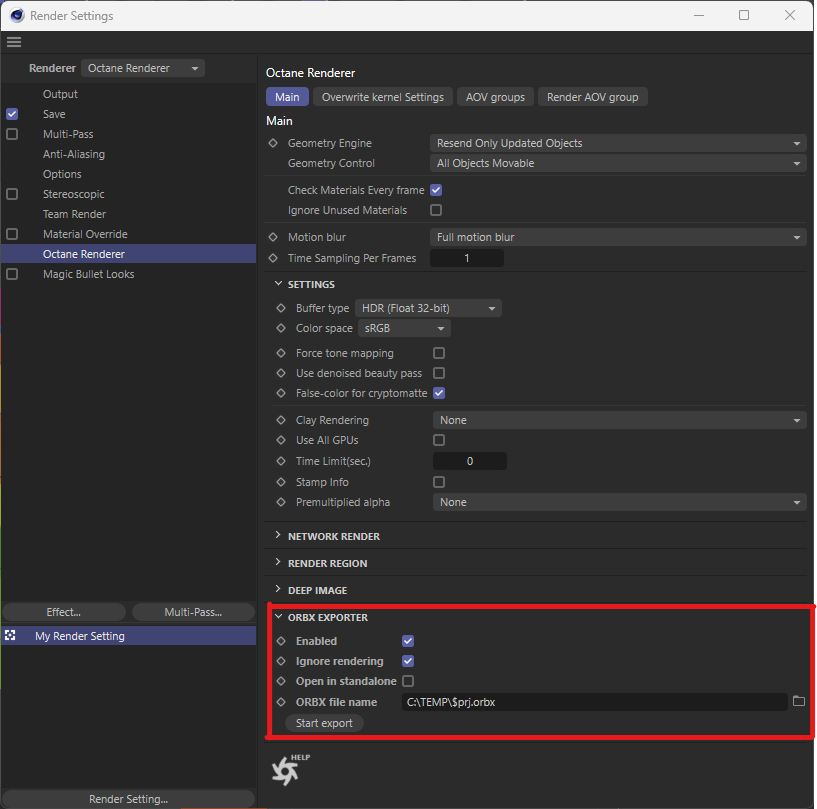
Frist, you will need to prepare your Cinema4D project file.
For this go into the Render Settings -> Octane Renderer -> Main Tab
And untwirl the "Export ORBX" menue.
In there set the settings as described below. Use any folder you would like.
Then save the file.
That's it.
Remember to turn the "Enabled" checkbox off again, when you want to render your project.
method 1: using cinema 4d'S "no Gui" version
• Open Windows Explorer
• In the adress bar just type in sendto and hit enter
• In the SendTo folder right-click and choose New -> Textfile
• Change the name of the file to ORBX
• Open the text file and paste in this:
@echo off
set c4d="C:\Program Files\MAXON\Cinema 4D 2024\"
set inputname=%1
set outputname=%~dpn1.orbx
echo please wait...
cd %c4d%
%c4d%"Cinema 4D.exe" g_ignoreMissingOutputPath=true -nogui -render "%inputname%"
echo Converted %inputname% to %outputname%
echo ORBX EXPORT FINISHED!
echo Have a nice day.
pause
• Change the folder location of your Cinema4D installation in the 2nd line (marked red) to your actual destination
• Hit save
• Now change the file-format of the text document from .txt to .bat
• Done!
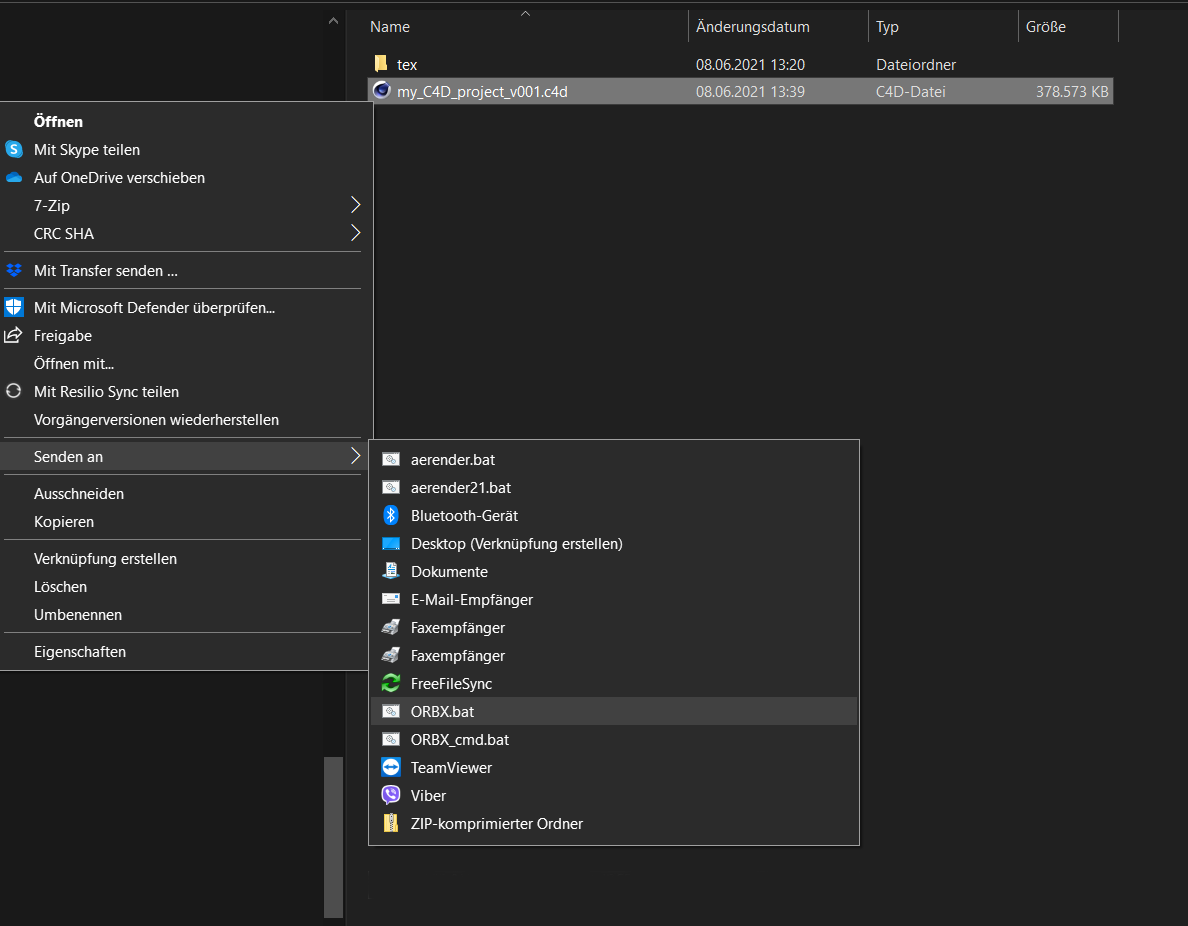
When you navigate to your Cinema 4D File, which you want to export as an ORBX via the Windows Explorer, just right-click on it and choose Send to -> ORBX.bat and wait for the export to be finished.
When it's done, press any key on the keyboard to close the commandline window.
When it's done, press any key on the keyboard to close the commandline window.
Method 2: Using Cinema 4D'S Commandline.exe version
If you want to use Cinema 4D's Commandline version instead (for example called via Thinkbox Deadline) then use the following code instead. Please note that the commandline version will show a lot more information in the commandline window and even some errors, however these will most likely not alter the result.
• Open Windows Explorer
• In the adress bar just type in sendto and hit enter
• In the SendTo folder right-click and choose New -> Textfile
• Change the name of the file to ORBX_cmd
• Open the text file and paste in this:
@echo off
set c4d="C:\Program Files\MAXON\Cinema 4D 2024\"
set inputname=%1
set outputname=%~dpn1.orbx
echo Convert %inputname% to %outputname%
echo please wait...
cd %c4d%
%c4d%"Commandline.exe" g_modulePath="%%{g_startupPath}/corelibs;%%{g_startupPath}/plugins" g_ignoreMissingOutputPath=true -nogui -render "%inputname%"
echo ORBX EXPORT FINISHED!
echo Have a nice day.
pause
• Change the folder location of your Cinema4D installation in the 2nd line (marked red) to your actual destination
• Hit save
• Now change the file-format of the text document from .txt to .bat
• Done!
When you navigate to your Cinema 4D File, which you want to export as an ORBX via the Windows Explorer, just right-click on it and choose Send to -> ORBX_cmd.bat and wait for the export to be finished.
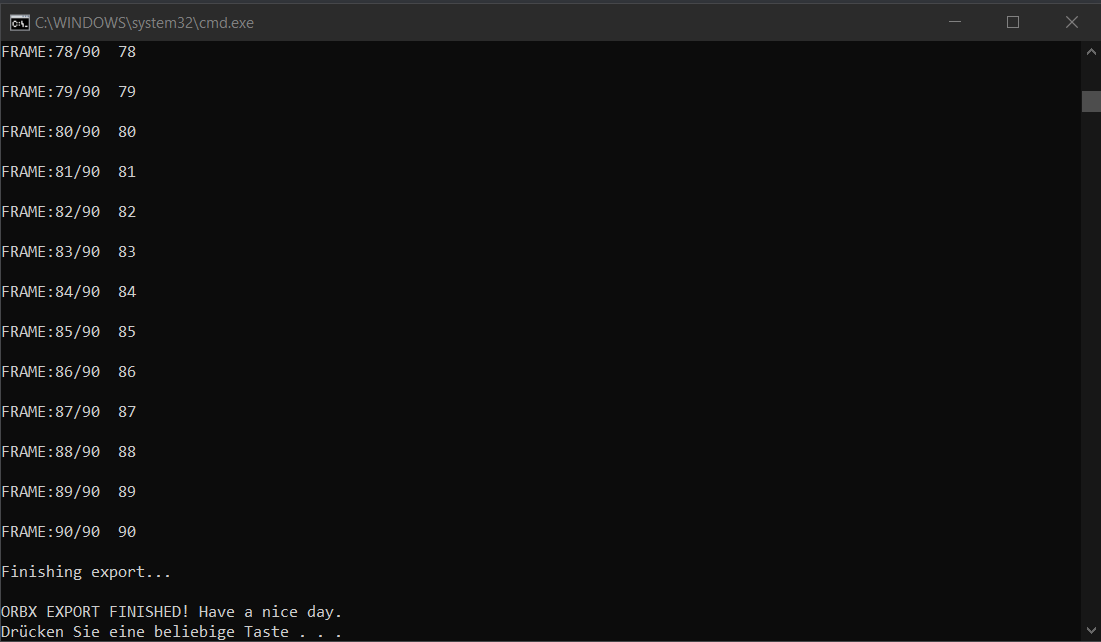
Another benefit of the Commandline.exe is that it is showing the frame progress, too.
Another benefit of the Commandline.exe is that it is showing the frame progress, too.
For Cinema4D 2023 (and older)
The ORBX commandline exporter was deprecated for Cinema4D 2023 and older due to changes in the Octane plugin.
We do not recommened to use it anymore and instead to use the new "Animated package for RNDR (orbx)" setting in the Octane Liveviewer or to use the "Export ORBX" option in the Render Settings -> Octane Renderer -> Main tab.
We do not recommened to use it anymore and instead to use the new "Animated package for RNDR (orbx)" setting in the Octane Liveviewer or to use the "Export ORBX" option in the Render Settings -> Octane Renderer -> Main tab.
Troubleshooting
If your export doesn't create an .ORBX file but the commandline window says everything went fine, please make sure you don't have any spaces in your filename or the folder leading to the C4D file.
Also please know that some Windows systems don't like scripts to run on the C-Drive. So if it doesn't work for you, transfer the whole folder to another drive and try again.
A tip: If the export fails, it would be a good idea to first try it with Cinema 4D's GUI enabled.
For this, just delete the "-nogui" parameter from the batch file, like this:
@echo off
set c4d="C:\Program Files\MAXON\Cinema 4D 2024\"
set inputname=%1
set outputname=%~dpn1.orbx
echo please wait...
cd %c4d%
%c4d%"Cinema 4D.exe" g_ignoreMissingOutputPath=true -render "%inputname%"
echo Converted %inputname% to %outputname%
echo ORBX EXPORT FINISHED!
echo Have a nice day.
pause
set c4d="C:\Program Files\MAXON\Cinema 4D 2024\"
set inputname=%1
set outputname=%~dpn1.orbx
echo please wait...
cd %c4d%
%c4d%"Cinema 4D.exe" g_ignoreMissingOutputPath=true -render "%inputname%"
echo Converted %inputname% to %outputname%
echo ORBX EXPORT FINISHED!
echo Have a nice day.
pause
Now, an instance of Cinema 4D will be opened and the export started right after.
A 2nd tip: If you want the Commandline window to automatically close after export, just remove the "pause" parameter in the last line.
Using the script with dropbox: We do not recommened to export the ORBX file using the script into a Dropbox folder, because the automatic Asset folder that is being created during the export (and its deletion afterwards) can confuse Dropbox and it could fail because of that.
If something does not work or you have some additional comments or suggestions, please feel free to write me a mail using the form on my contact page or directly to info+orbx@dinomuhic.com
Also, if anyone is interested to write this guide for MacOS and the terminal app, feel free to send it to me and I'll gladly include it in here.